Basic EC2 Management with Ansible
21 Dec 2013(UPDATE 2016/08/15: Here be monsters. This code is ancient, the style is not really idiomatic Ansible, and it’s likely that nothing works anymore.)
EC2 is cool. The ability to dynamically spin up a whack of free-to-cheap server instances anywhere in the world at any time, is.. well, pretty mean. Need to run a long computation job? Scale up a distributed system? Reduce latency to clients in a particular geographical region? YEAH WE CAN DO THAT.
The EC2 Management Console is a pretty great tool in of itself. Well laid-out and very responsive. But for a hacker’s hacker, a great tool to manage EC2 instances (amongst other things) is Ansible, which provides a way to automate tasks over an arbitrary number of servers, concurrently.
With EC2 and Ansible you can rapidly find yourself controlling an amorphous, globally-distributed network of servers that are eager to do your bidding.

Here’s a quick example that elides most of the nitty-gritty details. I’m going to spin up three micro instances in Asia Pacific. To do that, I’m going to use an Ansible playbook, which is essentially a YAML file that describes a sequence of commands to be performed. I’m going to delegate my local machine to handle that task, so I’m first going to store the following inventory in /etc/ansible/local:
[localhost]
127.0.0.1
The following playbook, spin-up-instances.yml is what actually launches these
guys. Here’s its header:
---
- name: Spin up some EC2 instances
  hosts: 127.0.0.1
  connection: local
  tasks:
    - name: Create security group
      local_action:
        module: ec2_group
        name: my-security-group
        description: Access my-security-group
        region: ap-southeast-2
        rules:
          - proto: tcp
            from_port: 22
            to_port: 22
            cidr_ip: 0.0.0.0/0

    - name: Launch instances
      local_action:
        module: ec2
        region: ap-southeast-2
        keypair: jtobin-aws
        group: my-security-group
        instance_type: t1.micro
        image: ami-3d128f07
        count: 3
        wait: yes
      register: ec2

    - name: Add instances to host group
      local_action: add_host hostname= groupname=my-security-group
      with_items: ec2.instances

    - name: Tag instances
      local_action: ec2_tag resource= region=ap-southeast-2 state=present
      with_items: ec2.instances
      args:
        tags:
          Name: Abrek

    - name: Give everyone a minute
      pause: minutes=1
Roughly, the tasks I want performed are each declared with a name and follow the ‘tasks:’ line. They’re relatively self-explanatory. When Ansible runs this playbook, it will execute the tasks in the order they appear in the playbook.
First I create a security group in Asia Pacific (Sydney) for all the instances I want to launch, and then go ahead and actually launch the instances. You can see that I launch them as a local action on my machine. I’m using micro instances (the most lightweight instance type available) and pick an Ubuntu LTS Server machine image for each. I then do some bookkeeping and tag each instance with the name ‘Abrek’. The final task just pauses the playbook execution long enough for the instances to get up and running.
Fun fact: ‘Abrek’ was the name of one of the first two Soviet monkeys shot into space. Today is apparently the 30th anniversary of his safe return.
Now, I also want to install some software on each of these guys. I’ll separate all that into two groups: some essentials, and a specialized stack consisting of 0MQ and supporting libraries. To do that, I’ll create two separate files called ‘install-essentials.yml’ and ‘install-specialized.yml’.
I’ll keep the essentials bare for now: git, gcc/g++, and make. Here’s
install-essentials.yml:
---
- name: Install git
  apt: pkg=git update_cache=yes

- name: Install gcc
  apt: pkg=gcc

- name: Install g++
  apt: pkg=g++

- name: Install make
  apt: pkg=make
I can grab all of those via apt. ‘update_cache’ is equivalent to ‘apt-get update’, which only needs to be done once.
Next, the specialized stuff in install-specialized.yml:
---
- name: Grab 0MQ
  command: >
    wget http://download.zeromq.org/zeromq-4.0.3.tar.gz
    creates=zeromq-4.0.3.tar.gz

- name: Unpack 0MQ
  command: >
    tar -xzf zeromq-4.0.3.tar.gz
    creates=zeromq-4.0.3

- name: Get libsodium
  command: >
    wget https://download.libsodium.org/libsodium/releases/libsodium-0.4.5.tar.gz
    creates=libsodium-0.4.5
    chdir=zeromq-4.0.3

- name: Install libsodium
  shell: >
    tar xzf libsodium-0.4.5.tar.gz;
    cd libsodium-0.4.5;
    ./configure && make && make check && make install
    chdir=zeromq-4.0.3

- name: Install 0MQ
  shell: >
    ./configure; make; make install
    chdir=zeromq-4.0.3

- name: Install libtool
  apt: pkg=libtool

- name: Install automake
  apt: pkg=automake

- name: Install automake
  apt: pkg=autoconf

- name: Install uuid-dev
  apt: pkg=uuid-dev

- name: Grab CZMQ
  command: >
    wget http://download.zeromq.org/czmq-2.0.3.tar.gz
    creates=czmq-2.0.3.tar.gz

- name: Unpack CZMQ
  command: >
    tar xzf czmq-2.0.3.tar.gz
    creates=czmq-2.0.3

- name: Install CZMQ
  shell: >
    ./configure && make;
    ldconfig
    chdir=czmq-2.0.3
Lots going on here. I use a variety of apt and shell commands to download and install everything I need.
Now to add those tasks back into the spin-up-instances.yml playbook so that
the software gets installed right after the instances boot up. I can append
the following to that file:
- name: Install essential and specialized software
  hosts: my-security-group
  user: ubuntu
  sudo: True
  tasks:
    - include: tasks/install-essentials.yml
    - include: tasks/install-specialized.yml
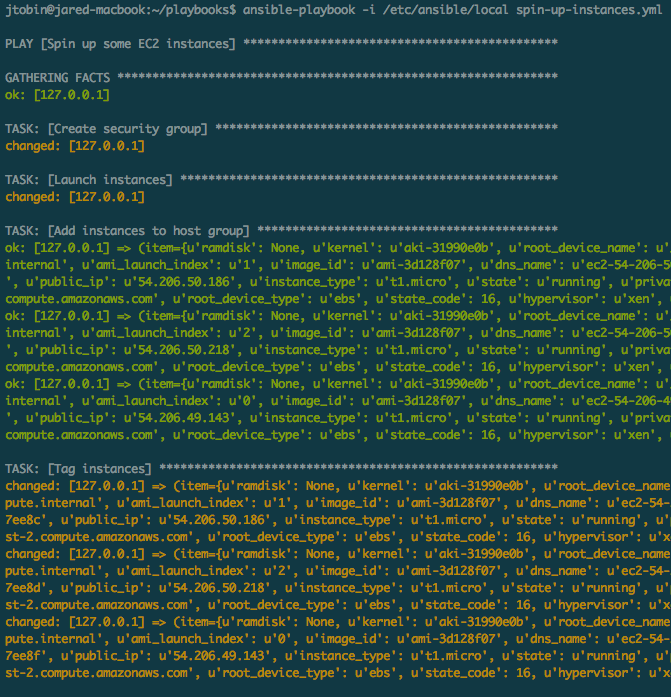
Let’s run the playbook and see those instances get launched. I need to use the ‘local’ inventory that I set up, so I pass that to ‘ansible-playbook’ explicitly.
Running it, we can see the security group being created, the instances popping up, and tags getting assigned:
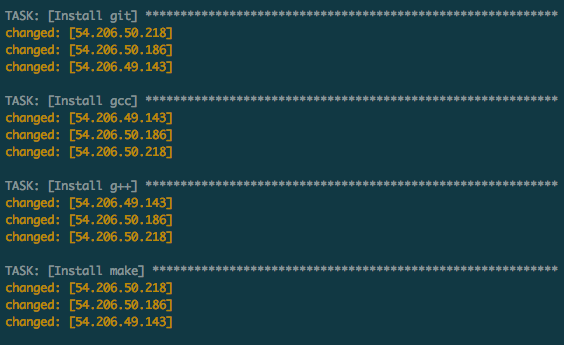
Our essential software getting pulled down:
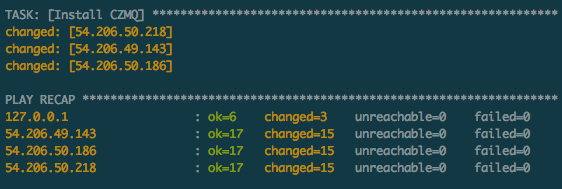
And the tail end of our 0MQ stack showing up before the play ends with a summary.
For a quick sanity check to ensure that everything really did go as planned, I can look for the CZMQ header on each instance. This time I’ll run a quick ad-hoc command, identifying the hosts via the ‘Abrek’ tag:

Voila, three servers ready to roll. Great stuff.
To fill the missing details, you might want to check out the excellent Ansible documentation, as well as the great tutorials at AnswersForAws.